Easy Homemade Ricotta Cheese
Now that we have our own source for delicious, raw milk the possibilities are endless. Butter, yogurt, ice cream, sour cream, and of course cheese. This easy homemade ricotta cheese recipe is the best place to start.

When our Jersey cow calved and came into milk, it didn’t take long for our fridge to fill up with jars and jars of fresh milk. Even while giving over half of it to her calf! Of course, we drink a lot of the milk and I use it in many recipes. I’ve also been making homemade butter every few days.
Naturally, learning how to make cheese was the next step. I’ve been working on mozzarella (for pizza night) and cream cheese (for homemade sourdough bagels). But I originally started with this easy homemade ricotta cheese.
Ricotta is so simple to make. It’s a great place to begin when learning how to make cheese. It requires very little hands-on time, ingredients, or equipment. The outcome is a delicious, soft cheese that’s incredibly versatile.
Ingredients for Ricotta Cheese
All you need to make ricotta cheese at home is milk and something acidic to curdle the milk, such as apple cider vinegar, lemon juice, citric acid, or you can also use white vinegar.
Whole milk is best but you can get away with 2%. I have made it using some of our milk that I skimmed a little cream off of but I typically use it whole. Goat’s milk will work as well.

I always have vinegar in my kitchen but not always lemons so I will use whatever I have on hand. They both work great for making ricotta.
This recipe can be made in less than an hour so you don’t have to set aside too much time to make it. Let it warm and sit while you’re preparing something else in the kitchen.
Equipment You Will Need
There isn’t a lot of equipment involved in making ricotta cheese but you will need a few tools.
- Large pot-A stockpot or large saucepan will work
- Food thermometer-I use an instant-read food thermometer for cheese making and other recipes so it’s handy to have one in the kitchen
- Cheese cloth or fine strainer- Read this post for tips on how to care for your cheesecloth after making cheese!
- Mixing spoon
- A jar for collecting and storing the whey to use in other recipes
How to Make Easy Homemade Ricotta Cheese
Start by pouring a half-gallon of milk (or a gallon) into a stockpot. I usually end up with about two cups of ricotta for every half gallon of milk.
Turn the stove to medium and heat the milk to at least 175 degrees F but no more than 200 degrees. Use an instant-read thermometer to monitor the temperature and stir occasionally.
Once the milk has warmed up, add the vinegar or lemon juice. I use about 1/4 cup per half a gallon of milk. If you use too much, you might taste it in the cheese! Stir this in very gently and turn the heat down to very low.
Let it sit for about 10-15 minutes. You should start to see the curdles separating from the whey within a few minutes! If you don’t see any separation after several minutes, add a bit more vinegar and check the temperature to make sure it is staying nice and warm.

Once you have a lot of cheese forming, use a large strainer to scoop it out into a cheesecloth-lined bowl. If you don’t have any cheesecloth, just set the strainer over a bowl and let it drain that way.

I like to tie up the ends of the cheesecloth and let it drain for about 15-20 minutes over a bowl. I don’t have knobs or handles on my kitchen cabinets so I just tie it over my stand mixer!

Don’t discard the whey! Pour it into a jar and store it in the fridge for a few days. It can be used in place of water for bread and other baking recipes or to make smoothies more nutritious. You can also make more ricotta using the whey. This is how traditional ricotta is made.

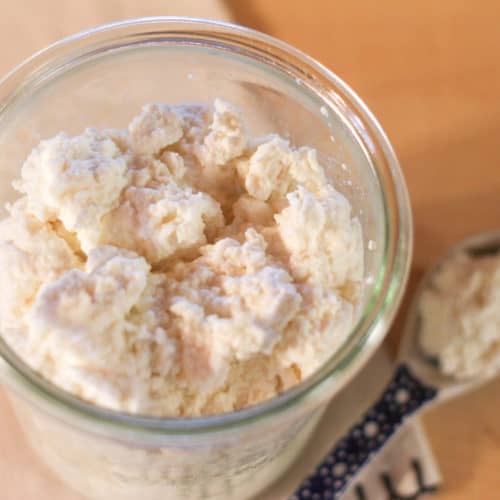
You can make your ricotta as wet or dry as you want. The longer you allow it to drain, the dryer it will be. For use in lasagna or other pasta dishes, a bit on the wetter side is better. My girls love when I mix this into pancake batter so I don’t let mine drain too long. I like it to be easy to mix into whatever I’m baking.

Store your delicious homemade cheese in an airtight container in the fridge for up to a week. You will want to use it soon, though, when it is at its freshest! Add it to cookies, pancakes, lasagna, cheesecake, or stuffed pasta. It is also yummy served on fresh fruit, spread on a piece of homemade bread or crackers, or on pizza.
You can freeze fresh ricotta for up to two months but once thawed, it is best when used within a recipe and not as tasty plain. But if you plan to add it to pasta or a baked dish, thawed ricotta will still work well!

If you want to branch off into more cheesemaking, including hard cheeses, check out this post on my favorite basic cheesemaking supplies!
I had zero cheesemaking experience when we first got our cow so this is where I started. Now I can whip up this ricotta anytime (I usually do it at least once a week) and have delicious, homemade cheese in the fridge. Don’t be afraid to give it a try!
Equipment
- Large pot
- Large spoon
- Instant read food thermometer
- Fine mesh strainer or cheesecloth
Ingredients
- 1/2 gal whole milk
- 1/4 cup apple cider vinegar or lemon juice
Instructions
- Heat milk in a large pot on low until temperature reaches 175-200 degrees F.
- Gently stir in vinegar.
- Let sit for about 15 minutes and you will begin to see the curds separate from the whey.
- Scoop out the curds using a large fine-mesh strainer or ladle into a cheesecloth-lined bowl.
- Allow to drain for about 15 minutes, or more or less depending on how wet or dry you want the cheese to be.
- Store in an airtight container in the fridge.
Pin it for later